 Like the
VCL, CLX has a back door to give programmers extensibility. Kylix allows
direct access to CLXDisplay, a C interface to the Qt runtime, and the ability
to directly access any Linux API. CLXDisplay will be portable to other
environments.
Like the
VCL, CLX has a back door to give programmers extensibility. Kylix allows
direct access to CLXDisplay, a C interface to the Qt runtime, and the ability
to directly access any Linux API. CLXDisplay will be portable to other
environments.
Abstract:CLX, VisualCLX, CLXDisplay and Qt explained.
By Bruno Sonnino
When Delphi was released, it came with a set of components named the Visual Component Library. The VCL is based on the Windows API, which it uses extensively. In order to provide unlimited extensibility, the VCL's architects left a back door open. Developers could use the Windows API or any C API directly. This widened the application range and allowed the development of all kinds of Windows applications. As a Delphi programmer, you take this extensibility for granted.
Now there is Kylix. One of the first obstacles that the Kylix development team must have faced is that the VCL is based on Win32, so unless you use an emulation library like Wine you cannot use Windows API functions. The Kylix team had to rewrite the VCL completely in order to remove all Win32 dependencies.
Thus CLX -- the Component Library for Cross-platform-- was born. The visual portion of the new VCL was named VisualCLX; it uses the Qt runtime library as its graphics and GUI engine. The Qt runtime is based on a C++ class library developed by a Norwegian company named Trolltech. Qt is available on Windows, Linux, Solaris, and many other platforms. There is even a light version for Palm computers.
This library has a special kind of design. It is a very thin layer over the environment. Instead of using the operating system's native API, it uses only some primitives and draws everything by itself. That is, it does not use the Button provided by Windows, for instance -- it draws its own button. This kind of design has several advantages:
Like the
VCL, CLX has a back door to give programmers extensibility. Kylix allows
direct access to CLXDisplay, a C interface to the Qt runtime, and the ability
to directly access any Linux API. CLXDisplay will be portable to other
environments.
The relation between VisualCLX and the Qt runtime is very similar to the relationship between the VCL and Windows GUI APIs. A lower-level API beneath VisualCLX -- called CLXDisplay -- was developed to provide a fully programmable interface layer between VisualCLX and Qt.
Some VisualCLX components are simply very light weight abstractions of Qt widgets. For example, the CLXDisplay API provides a class named QButton that directly represents a Qt button. VisualCLX encapsulates this class, creating a component named TButton, and adds the properties, events, and other methods of the component.
Other VisualCLX components, such as the Tab control, are custom classes written in VisualCLX and CLXDisplay. The Kylix team was very careful with VisualCLX to emulate VCL behavior, so a Windows developer can easily port Windows applications to Kylix without traversing a major learning curve. This was accomplished by adding properties, methods, and events to Qt widgets and custom VisualCLX components to make them work just like their VCL counterparts. This component programming was done with combinations of VisualCLX programming and the CLXDisplay API.
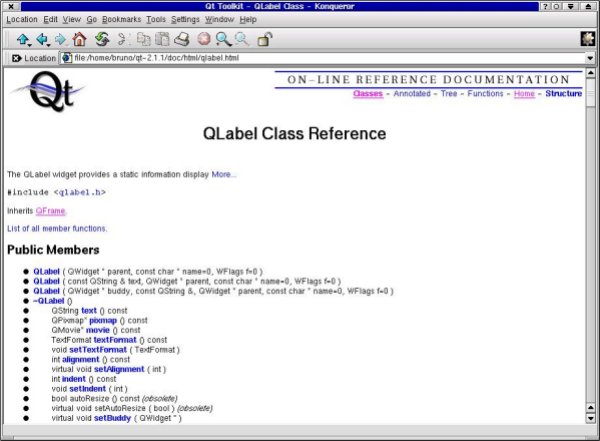
The Qt library is a set of C++ classes, and it's not entirely compatible with Kylix. To allow programmers to use Qt functionality, Borland engineers created CLXDisplay by "flattening" the classes, transforming them to cdecl functions. You will see that there is no CLXDisplay help file provided in Kylix, so you must find references in other places. The best reference is Qt Help itself. It is a set of html files, installed in the Doc directory of the Qt installation. If you don't find the files on your hard drive, you can download them from TrollTech: http://www.troll.no.
When you are examining the help files, you will find code like this:
QLabel(QWidget *parent=0, const char *nome=0, WFlags f=0)This is one of the constructors of QLabel, the class that represents a label in a Form. To use it in Kylix, you must make some changes:
function QLabel_create(parent: QWidgetH; name: PAnsiChar; f: WFlags): QLabelH; overload; cdecl;This constructor returns a QLabelH handle, which can be used with the other QLabel methods.
For example, to set the text of the label, you must use the setText method, declared in Qt Help as:
virtual void setText(const QString &)This is the equivalent of a Pascal procedure that receives a string as a parameter. This method is translated as:
procedure QLabel_setText(handle: QLabelH; p1: PWideString); cdecl;As you can see, the first parameter is the handle of the label and the second parameter is a pointer to a string. This code changes the label text:.
TxtLbl := 'this is a test';

QLabel_setText(LabelHandle,@Txtlbl);
If you wish to use the CLXDisplay API to set the text of a CLX label (this is not a real sample; of course you would simply access Label1.Text), you could create some code like this:
procedure TForm1.FormCreate(Sender: TObject);

var

  TxtLbl : WideString;

begin

  TxtLbl := 'this is a test';
  QLabel_setText(Label1.Handle,@Txtlbl);

end;
As you can see, you can mix VisualCLX with CLXDisplay functions, extending your program in ways CLX's architects did not anticipate.
Another concept introduced by Qt and implemented in the CLXDisplay API is the notion of slots and signals. They are the Qt equivalents of events and event handlers. When a button is clicked, it emits the clicked() signal. This is equivalent to the activation of the OnClick event when a TButton instance is clicked.
A signal can be connected to a special kind of method called a slot. When a slot is connected to a signal, it is executed when the signal is activated. For example, if we connect the clicked() signal of a QButton to the quit() slot of QApplication, the application will terminate when the button is clicked (assuming that's what the quit() slot does). A slot is like an event handler: When you assign an event handler to an event, the event handler is executed when the event is fired.
The Qt API includes many predefined slots and signals. If you want to create new slots and signals, you can only do so using TrollTechs Qt C++ Framework. This kind of functionality is not provided in Kylix at the CLXDisplay level. Note that a separate Qt C++ license from TrollTech is required for proprietary use of the native Qt C++ API.
Ready? Let's go.
Start by creating a new console application, using File | New and selecting Console Application. This creates a simple project file with no forms. We will not use visual design to develop this small application.
We must remove the {$APPTYPE CONSOLE} directive, put the Qt and QForms units in the Uses clause and include the following code:
Program Project1;
uses
Qt,
QForms,
SysUtils;
var
App : QApplicationH; // QApplication handle
MainWnd : QWidgetH; // Main window
Button : QWidgetH; // Button handle
MainForm : TForm; // Main application form
Caption : WideString;
begin
// initializes application and stores handle in App
Application.Initialize;
App := Application.Handle;
// creates main window
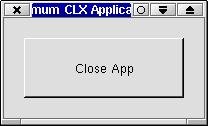
MainForm := TForm.Create(nil);
Caption := 'Minimum CLX Application';
MainWnd := MainForm.Handle;
// set window caption and size
QWidget_setCaption(MainWnd,@Caption);
QWidget_setGeometry(MainWnd, 100,100,200,100);
// creates the button
Caption := 'Close App';
Button := QPushButton_create(@Caption, MainWnd, PChar('Button'));
// sets button size
QWidget_setGeometry(Button,20,20,160,160);
// sets application main widget
QApplication_setMainWidget(App,MainWnd);
// shows widget and enters application loop
QWidget_show(MainWnd);
QApplication_exec(App);
end.
This isn't exactly what you do in Delphi -- nor in Kylix using CLX -- this
code is very simple to understand.
Any C++ Qt application has a class named QApplication that manages the control flow. The application must have a main widget that will contain all other widgets. We called this widget MainWnd.
The first thing to do is initialize the Application variable. It is declared in QForms.pas and is created when the application begins to execute. We assign Application.Handle to the variable we have declared, App, a QApplication handle.
The next step is to create the main window. To be a VisualCLX application, we must have a component inherited from TControl. This will be the main Form. We create it using TForm.Create, passing nil as its owner. To use CLXDisplay functions, we store the handle -- a QWidgetH -- in the MainWnd variable. To set widget properties, we use the QWidget_set... methods, passing the desired position, size, and caption. The window created here will be at position 100,100 and will have a width of 200 pixels and a height of 100 pixels.
 The next
step is to create a button with QPushButton_create.
This time, we tell the application that the parent of the button will be
the main form.
The next
step is to create a button with QPushButton_create.
This time, we tell the application that the parent of the button will be
the main form.
Finally, we set the main widget, show it, and enter the program loop. If you run the program, you will see it is fully functional. I am sure you will not start building applications like this one. I developed this one only for educational purposes, to show how things work internally, when you create a visual application.
function QObject_connect(sender: QObjectH; signal: PAnsiChar; Receiver: QObjectH; member: PAnsiChar): Boolean; overload;Sender is the component that emitted the signal and Receiver is the component whose slot will be executed when the signal is emitted. Take a look at the signal and member parameter types. You will find that there is something wrong here. Both are PAnsiChar parameters, but we want to pass class members. The first time I saw this in Qt.pas, I thought the conversion was incorrect. What gives?
If you take a look at the connect function in Qt help, you will see it is declared like this:
bool connect (const QObject *sender, const char *signal, const char *member)A typical C++ call to this function is like this:
connect(Button,SIGNAL(clicked()),App,SLOT(quit())So we are passing a method name to some strange function named SIGNAL, which converts it into a PChar. This function may be a macro, converted by the C++ preprocessor. If we take a look in qobjectdefs.h, we can see:
#define SLOT(a) "1"#a

#define SIGNAL(a) "2"#a
What the preprocessor does here is add a number 1 or 2 to the method name and convert it to a string. That way, SLOT(quit()) will be translated to 1quit() and SIGNAL(clicked()) will be transformed into 2clicked().
Knowing this, we can do the same conversion by hand, connecting a signal to a slot. To make the button-click close the application, we can use code like this:
QObject_connect(Button,PAnsiChar('2clicked()'),App, PAnsiChar('1quit()'));
If you insert this line before QApplication_setMainWidget and run the program,
you will see that the application closes when you click the button. That
is because we connected the clicked() signal of the button to the quit()
slot of QApplication. We can do the same to connect other slots and signals.
Let's say we wanted the user to confirm the exit when he clicks the button. That cannot be done by connecting a slot to a signal. There must be some other mechanism to do it. If you were using C++, you could create a customized slot, but we do not have this capability in Kylix.
In Kylix, we must use the hooks technique. Take a look at this event in Qt.pas:
>QButton_clicked_Event = procedure() of object cdecl;As our event handler will handle the clicked() event, it must be a procedure like this. But we aren't using any classes and this event is a procedure of object. So we must define a dummy class to handle the event:
type

  TDummyClass = class

    procedure ButtonClicked; cdecl;

  end;
The ButtonClicked method will be the handler that is executed when the user clicks the button:
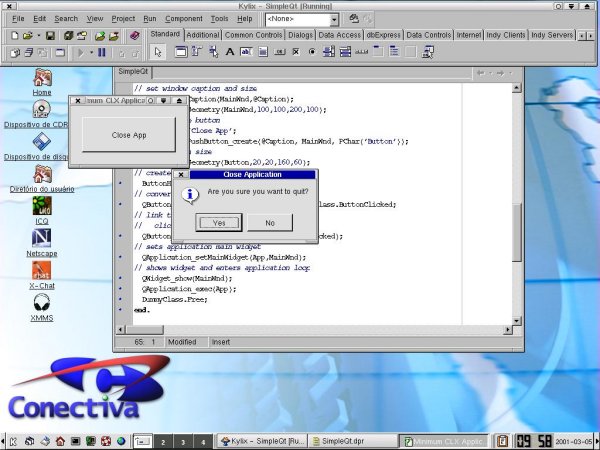
procedure TDummyClass.ButtonClicked;

var

  Caption, Text, YesText, NoText : WideString;

begin

  Caption := 'Close Application';
  Text := 'Are you sure you want to quit?';
  YesText := 'Yes';
  NoText := 'No';
  // create messagebox
  if QMessageBox_query(@Caption, @Text, @YesText, @NoText, MainWnd,PChar('mb'))then
    QApplication_quit(App);

end;
See how it works? This code simply displays a query messagebox. If the
user clicks the Yes button, it closes the application. If the user clicks
the No button, nothing happens.
Now that we have created the event handler, we must link it to the clicked() event. The first thing to do is to create a button hook with QButton_hook_create. We pass the button handle as a parameter to this function, and it returns the button hook, like this:
ButtonHook := QButton_hook_create(Button);Once we have created the hook we must link it to the event handler. Because we want to hook the method to the clicked event, we will use the QButton_hook_hook_clicked procedure. It hooks the clicked event to the handler we created. The first parameter to this function is the hook we've just created and the second is a QHookH.
If we take a look at Qt.pas, we'll see this:
QHookH = TMethod;This means, simply enough, that a QHookH is a TMethod. So we must pass a TMethod as the second parameter. To convert the handler to a TMethod, we declare a variable of type TMethod and do this assignment:
QButton_clicked_Event(BtnClicked) := DummyClass.ButtonClicked;Then we can pass BtnClicked as the second parameter of QButton_hook_hook_clicked. Removing the line with the QObject_connect function completes the application. Here's how it looks now:
program SimpleQt;

uses

  Qt,

  QForms,

  SysUtils;


type

  TDummyClass = class

    procedure ButtonClicked; cdecl;

  end;

var

  App : QApplicationH;  // QApplication handle
  MainWnd : QWidgetH;   // Main window handle
  Button : QWidgetH;    // Button handle
  MainForm : TForm;     // Main application form
  Caption : WideString;
  DummyClass : TDummyClass;
  ButtonHook : QButton_hookH;
  BtnClicked : TMethod;


procedure TDummyClass.ButtonClicked;

var

  Caption, Text, YesText, NoText : AnsiString;

begin

  Caption := 'Close Application';
  Text := 'Are you sure you want to quit?';
  YesText := 'Yes';
  NoText := 'No';
  // creates messagebox
  if QMessageBox_query(@Caption, @Text, @YesText, @NoText, MainWnd, PChar('mb')) then
    QApplication_quit(App);

end;


begin

  DummyClass := TDummyClass.Create;

  // initializes application and stores handle in App
  Application.Initialize;
  App := Application.Handle;

  // creates main window
  MainForm := TForm.Create(nil);
  Caption := 'Minimum CLX Application';
  MainWnd := MainForm.Handle;

  // set window caption and size
  QWidget_setCaption(MainWnd,@Caption);
  QWidget_setGeometry(MainWnd,100,100,200,100);

  // creates the button
  Caption := 'Close App';
  Button := QPushButton_create(@Caption, MainWnd, PChar('Button'));

  // sets button size
  QWidget_setGeometry(Button,20,20,160,160);

  // creates the button hook
  ButtonHook := QButton_hook_create(Button);

  // convert the method to a TMethod
  QButton_clicked_Event(BtnClicked) := DummyClass.ButtonClicked;

  // link the method to the clicked event of the button
  QButton_hook_hook_clicked(ButtonHook, BtnClicked);

  // sets application main widget
  QApplication_setMainWidget(App,MainWnd);

  // shows widget and enters application loop
  QWidget_show(MainWnd);
  QApplication_exec(App);
  DummyClass.Free;

 end.
Run the application and you will see that it performs as expected.
As you can see, Kylix lets you access the full power of Linux and Qt so you can build complete applications using the best IDE available for Linux. And when Delphi 6 is available, this code will be portable between Linux and Windows.
I would like to thank Michael Swindell, Borland's director of product management for RAD tools, for suggestions and corrections he made during the preparation of this article.